So after a half-joking remark left on Facebook, and then a somewhat more serious discussion with my mother this weekend, I’m seriously contemplating teaching a series of home-ec type classes. Little basic things… replacing a zipper, hemming a skirt, cooking basic meals from scratch, how to make a birthday cake, how to make a budget, how to can tomatoes… basic stuff that no one these days ever really teaches.
Except the modern way, you know: Online.
I don’t really have any details worked out, and I’m still in contemplation/research mode, but I’m putting it out here anyway, because that’s how the universe works. So, ok, Universe, is this a good idea? What do you have to tell me about this?
So over the last few days I started noticing something out in my garden. My tomatillos have had flowers for months, but they aren’t fruiting. I got one zucchini, and one tiny yellow squash, but the rest of the flowers are not producing anything. My peppers flowered, but aren’t forming fruit either.
The cucumbers and the beans are going gangbusters, but that’s really about it.
I could just be impatient, but I swear this time last year I was already swimming in cherry tomatoes. What on earth could be wrong?
One thing I did realize looking around is that a tree that was tiny last year grew to three times it’s size and is cutting off the sun by about 4:30. That tree is coming down this weekend. (don’t worry, it’s nothing nice, it was a volunteer and we have plenty of other trees)
Unfortunately the other thing I noticed doesn’t have such a simple solution.
My bees are gone.
I sat outside for an hour, watching, listening, and not a single bee flew by. Not one. One other thing I noticed is that one of my main bee-attractors out back, my confederate jasmine, isn’t blooming. Normally by now it would be covered in fragrant yellow blooms. The jasmine out front is going crazy; basically, everything in the front yard is going gangbusters, but my main planting area is… stagnating. I wonder what is happenning?
I am hoping no neighbors used pesticides that might have killed them, but beyond that it’s time for me to start making my yard more attractive to bees so that the ones still left will come back and visit me more often.
Poking around my notes from previous garden planning, I’m going to try to improve the situation by picking up some more flowering plants and fragrant herbs. Lavender (currently all mine is in the front yard), some dill, some bee balm, lemon balm and a butterfly bush will go around the raised beds themselves. I’m also going to snag some verbena in hanging baskets (one of my favorite flowers… why didn’t I get any this year?!) and maybe even get a hummingbird feeder.
I’ll update in a few weeks, but I sure hope this helps. Wish me luck!
With all the devastating happenings in the Gulf of Mexico right now, it seems like many of us are really taking a good hard look at the oil consumption in our lives. Cutting back on driving and using gasoline are the obvious answers, but did you know that those uses really only comprise about 40% of the oil we use? I was sort of surprised by that.
According to this piece by GOOD, there is far more oil hidden in the little tiny things we use every day without thinking much about them. Their article suggests some good places to look to see if you can make some changes, including your kitchen and bathroom.
For instance, the article points out that …”ingredients like mineral oil, petrolatum, and paraffin oil…are… derived from crude.” Reading some of the labels in the drugstore, these things are pretty much everywhere. I’ve recently talked about my switch to the coconut oil based deodorant (and I haven’t had a single stinky day since), but here are a couple of other tips for weaning yourself off petroleum based products. The bonus is that these natural alternatives are not only better for your body, but they are very economical too.
1. Hair conditioner. I know some people don’t need much more than a vinegar rinse, but given my vice of loving brightly colored hair, I need real conditioner. The hands-down best trick I have ever encountered is once again, coconut oil. Comb a little through your hair, wait 20 minutes, then shampoo. If your hair is super damaged, do it the night before and sleep in a cap. Coconut oil is easily found in most ethnic grocery stores, or any good farmer’s market.
2. Shampoo. From cutting back on washing by using cornstarch as a dry shampoo, to making your own natural shampoo, to even trying the “no poo” method, there are plenty of ways you can keep your hair looking great without petrochemicals. I personally use a pre-made natural shampoo, but stretch it as long as possible with simple rinses between washings and using a dry shampoo when I can. The bonus is that my haircolor lasts longer.
3. Facial Cleanser/Makeup Remover Olive oil. Yep, you heard me, plain old olive oil (although I recommend splurging on a really good extra virgin oil) is hands down the best makeup remover and facial cleanser you’ll ever come across. I can see a few of you cringing and thinking that has to be horrible for oily skin, but I’m here to tell you it actually has the exact opposite effect. Not only does it truly cleanse your pores, but when your skin feels hydrated, as it will after you cleanse, it has less of a need to produce it’s own oils. Your face will actually clear up. Trust me. Just rub a little bit into your skin, and then remove it with a hot cloth. You probably won’t even need moisturizer afterwards.
If you do, try a little grapeseed oil around your eyes and other problem areas. It’s full of anti-oxidants and is fabulous in the hydrating department.
4) Shaving Cream. Recently I convince my husband to give up his shaving cream and try shaving soap and a brush. He actually likes it, which is about as good a recommendation as you can get. You can buy this anywhere, or make your own if you’re adventurous, it’s so much cheaper than canned shaving cream and in addition to not containing petrochemicals, there’s almost no waste!
The other place where you can make a big difference is in your kitchen. Right underneath your sink where you probably keep those bottles of cleaning supplies. Again, according to GOOD: “Many household cleaning products are laced with petrochemicals that are as bad for you as they are for the planet. “
Making your own with a few simple ingredients like vinegar, baking soda, and essential oils is quick, cheap, effective, and won’t leave you running for your gas mask when it’s time to clean the shower. This post is a great place to get a few recipes. There are more over here, or check your local craft fairs, as there are plenty of people who’ll make them for you.
(edited to add: Kelli suggested another good recipe site in comments)
The GOOD article lists quite a few more things, plus the comments section is full of even more discussion. Check it out and see how much hidden oil you can remove from your life!
A few days ago, my husband and I picked some 6 pounds of mulberries from one of three trees in our yard. As I was picking, a group of children walked by, one commenting he thought those berries were poisonous. Wayne handed him one and told him to try it, and the kid said with some surprise that it was quite sweet. Well, yes. Yes it was.
It seems the Mulberry tree has gotten such a bad reputation that people in these parts routinely let the berries go to the birds. Weird, huh? Mulberry trees grow wild in so many parts of the country, and it’s pretty much free food. I like free food =)
Anyway, whether you’re getting immediate gratification from making a pie, making jam, starting the fermenting process on some wine, or even using the berries as a natural dye, the mulberry is an amazing fruit. This week, we’re talking pie, but as I get larger harvests, I’ll be covering making jam, wine, and even dyes.
I’d give you a straight recipe here, except that when using mulberries, there kind of isn’t one. The first step in making a good pie is eating a few of the berries. (oh darn! Except side-note here: Make sure your berries are ripe. Ripe means purple, like a blackberry. If you eat unripe berries, you’re going to wind up tripping, which might be why they have that reputation as being poisonous.)
Ok, once you’ve tasted your berry, think about how sweet it is, and how juicy. Pie is basically a small handful of ingredients: Fruit, sugar, spices if you want em, (cinnamon is always a good standard, but really this is personal preference. You could even try a savory herb like basil) water, lemon juice and cornstarch. There’s no hard recipe here. If your berries are tart, add about a cup of sugar. If they’re really sweet, you probably only need 1/4 of a cup. Don’t leave it out though, it helps make the syrupy parts. Same with the water, if they’re super-juicy, don’t add much water. The amount of cornstarch corresponds with the amount of added water. If you don’t add any, or only a little bit, add maybe a tablespoon of cornstarch. If you add a lot of water (up to a cup if you listen to some recipes) you should up the cornstarch to 3-4 tablespoons. Spice is up to your personal preference, but a starting point is about a tablespoon. Lemon juice is about the only constant. Use about a tablespoon.
Once you’ve thought about all that, get yourself a pie crust. Mine come from the grocery store because I am not gifted with the pie crust making gene. As you might have noticed, I’m not the sort of cook who uses hard measurements, and pie crust is one of those things that requires precision and attention to detail. Kudos to you if you have the attention span to make your own.
Anyway. Put your pie crust in the bottom of a greased pie pan. add your berries. sprinkle your other ingredients over the top and then mix it all around with your hands. (um. yes, your palms might turn purple. get your kid to do this part or use a wooden spoon if you have the sort of job where people look at you funny for having purple hands)
If you decide to add a little water, do it now. Just drizzle over the top.
Next, take some super thin pats of butter (maybe a tablespoon?) and spread them out over the top of the pie mixture. Then put your second crust over the top and seal up the edges. Slice a few slits in the top crust.
Now, bake at 375 for somewhere around 40 minutes. Your berry juices should be bubbling up through the slits. if your crust edges start to get too brown, just cut some tinfoil into strips and cover the edges with it.
Let your pie cool. This isn’t one you want to eat piping hot. Add ice cream if you’re so inclined. =)
If you are concerned about the probability of toxic chemicals on your fruit, or the damage that cancerous chemicals will cause to our environment and the people who grow and pick the foods on these mega farms, one thing you can do is learn to grow your own.
Strawberries are one of the most container-friendly plants, making them pretty perfect for even tiny patio gardens. You can even grow them in hanging bags, or DIY topsy-turvy planters.
They like well drained soil with lots of organic matter. If you’re planting them in a bed, leave 10 or so inches between plants so they can spread. If you’re growing them hanging, this isn’t as important.
One mistake I made: There are TWO kinds of strawberries. “June” and “Everbearing”. If you plant June, you won’t get a crop the first year, so don’t cry thinking you did something totally wrong! Everbearing will bear fruit the first year, and sometimes right up until frost, but they wear out a little more quickly.
Put your plants somewhere where they can get at least a half-day’s worth of good sunlight, keep them nicely watered, and then enjoy the “fruits” of your labor all summer long.
If you’d like a slightly more technical explanation of growing these plants, check out this article from the backyard gardener.
Once you get a crop, remember strawberries freeze well, and are also one of the easiest fruits to make jams from.
Here’s one of my favorite recipes, only slightly variated from one in Nigella Lawson’s book “How to be a Domestic Goddess”.
Put a saucer into the freezer.
3 parts strawberries, cut in half
2 parts sugar
a couple tablespoons lemon juice
dash balsamic vinegar per cup of fruit.
Mix it all together in the biggest pan you have, and then bring it to a boil. Let it boil for about 5 minutes, then sneak a tiny drop out with a spoon and drop it onto the saucer you had in the freezer. See if it thickens. If it doesn’t, keep boiling and repeat test every minute. Once it does thicken, pull it all off the heat and ladle it into prepared canning jars. Wipe the lids before sealing, then turn the jars over onto a thick towel. Let the jars rest for at least 12 hours. (You’ll hear the lids pop as they seal. This is good.)
If a jar didn’t seal properly, don’t fret, just store it in the fridge and eat it first. (or, you could prepare a water bath, boil the submerged jar for 20 minutes and repeat the upside down part…)
I know many people who are moderately satisfied in their traditional jobs, and possibly more than my fair share of really lucky ones who absolutely love what they do. Different things work for different people, and that’s one thing I love about this world. However, I realized early on that a traditional job wasn’t going to work for me and so I’ve spent most of my life figuring out how to make my own way – how to organize my life so that I can provide for myself most of what I need. Because of that, several friends have commented to me over the years that I seem to know how to live reasonably well on so much less money than anyone they know, and that they really don’t understand how I do it. Those comments are one of the reasons I started the “Year of Living Dangerously” series. Not only do I want to talk about what I’ve learned, but I want to show other people who are figuring out how to do the same for themselves. I would love to see this spread, because with a community of like-minded people working together, living sustainably becomes easier and easier to accomplish.
Along those lines, since this is the week I’m talking about people who inspire me, it seems like as good a time as ever to talk about Dolly Freed and Possum Living. I can’t even remember where I first saw this link, it’s been open on my desktop for weeks waiting for me to get around to sharing it with you, but Dolly Freed is an amazing woman, and i think you should get to know her.
In her own words: “In 1978, as a cocky 18 year old, I wrote a book about how my dad and I lived a rich and happy life in a middle-class neighborhood with only an occasional part-time job. We gardened, raised rabbits and chickens in the basement, and bought bulk food at a feed and grain store. The book was chock full of ideas for frugal living that worked so well we lived on the equivalent of $5800 a year in current dollars. We joked that if possums could live without a job, so could we, hence the title.”
Summer sort of hit here with just a wave hello to Spring last week, and with it, the parade of ants through the kitchen and garden has started. I made these baits last year and they worked pretty well, so I thought Id re-post this here for anyone who might be experiencing the same difficulties as I am persuading the critters to go elsewhere…
_______________
One of the not-so-awesome things about summer in the south is the never-ending parade of ants around the yard (and often the kitchen). I’m always really hesitant to use commercial pesticides, and have found quite a few ways to help keep the ants in check without them. For starters, Instant Grits. Sprinkle them around the mound (but not directly on it!) and the ants will eat the grits, be unable to digest them, and basically explode. Sorry ants, but this is MY house.
Also, any strongly smelling granulated substance, like cinnamon or fine coffee grounds will perform as a barrier and can be used around the corners of cabinets, etc. where pets won’t disturb it. If you can see where they’re coming in, caulk it, or if you can’t, try putting something like vaseline to interrupt their track. Of course try to keep your kitchen clean and counters wiped, a vinegar spray can erase the scent of their trails, making them less likely to return. Also, as pet food is a favorite attraction, try putting your pets food bowls inside a larger, shallow bowl of soapy water. That tip works great for outdoor feed bowls as well.
Despite all of that, last year the ants seemed to be gearing up for world domination. I’d manage to get rid of one pile, only to see another pop up a few feet away. I swear I could hear them snickering when I walked by.
So I did a little research and decided to try making my own ant baits out of ingredients I felt safe using in my yard. It took a little trial and error to get the proportions, and I made the first batch WAY too wet. The last batch was more like toothpaste, and that’s pretty much just right. Here’s how I did it, so you can make your own. It’s best to start early to avoid problems altogether.
First, you’ll need to assemble your supplies. You’ll need Borax, granulated sugar, water, some small containers with a removable lid (baby food jars are ideal for this. if you know a new mom, hit her up for a batch before she recycles them), a hammer and nail, and a spoon for measuring.
For starters, fill each jar about 1/3 of the way full with the borax. Then add the granulated sugar to fill it up to just over half. You might need to adjust this mix depending on how much of a sweet tooth your ants have. You want enough sugar to mask the taste of the borax, but not so much that there isn’t enough borax to do the job.
Once you have your dry ingredients mixed together, it’s time to add enough water to make a paste. This photo was taken during my first attempt at these, and I made them too wet. You’re looking for something just slightly runnier than toothpaste.
Once you’re satisfied with the consistency of your mixture, it’s time to use that hammer and nail to make holes in the lids of the jars, then close them up and place them strategically around your yard (or home). If you have larger ants, be sure to make the holes big enough for them to get into.
The idea is that the ants will find the baits and carry the tasty, but poisonous mixture back to the nest and feed it to the Queen. Once the Queen dies, so does the colony. These have actually worked better for me than anything else I’ve tried. As far as I can tell, they don’t go bad, so you can leave them out for a couple of months. Put them near enough to existing ant trails or hills that the ants find them, but not directly in their path. You can also put them inside cupboards if you have trouble inside. Just make sure your pets or kids don’t think they are toys. Borax is fairly safe, but it wasn’t meant to be ingested.
For more tips on how to use Borax i n the home, check out this post on home-made cleaning supplies:
So after spending the last couple of days outdoors cleaning up my yard (and subsequently getting eaten alive by the super-vicious mosquitos who thrive in my neighbor’s wisteria) finding this recipe in the Re-Nest blog was a welcome treat! I believe I’ll be making some of this veryvery soon!
Grow Your Own
Not only does catnip work against mosquitoes, but the plant that produces it a great visual addition for a functional yard scape. The plant you need is a perennial herb called Nepeta cataria. If you can’t find it at your local nursery, various online seed companies carry it. There are various recipes online but here is one I’d like to try: Catnip and Rosemary Mosquito Chasing Oil
* 2 cups catnip, stemmed
* 1 cup rosemary, cut in 6-inch sprigs
* 2 cups grapeseed oil or any light body-care oil
Roll herbs lightly with a rolling pin and pack into a clean jar. Cover with oil, seal jar and place in a cool, dark cupboard for two weeks. Shake jar lightly every day or so for two weeks. Strain into a clean jar, seal and refrigerate for up to 8 months unused. To use, rub on exposed skin.
Plant information and Recipe from SeattlePi.com & created by Ann Lovejoy.
One word of advice… don’t plant the catnip in the ground if you don’t want your cats rolling in it and destroying it…
Today I am lucky to have another guest blogger!
My friend Scott had a big life upheaval last year, and it’s so incredibly inspiring to see how he’s totally turned everything around, and is creating exactly the kind of life he wants. I’m doubly impressed by his ingenuity in creating all of this on an artist’s budget. ps. Scott also does super awesome illustrations. You might remember I bought one for my dad for Christmas last year.
And with that, take it away Scott!
___________________________________________________________________________
I’m an urban city dwelling kind of guy that now lives in the burbs. I’m a vegetarian, I try to eat healthy and I support “locally grown” vegetables to help replenish the community. Like many others, I was hit pretty hard with the recession and all of the sudden “$4.99lb for tomatoes” was not an option anymore. It got me thinking about just where did those tomatoes come from when they aren’t even in season and what chemicals are sprayed on them and could that be unhealthy.
My thoughts were confirmed when I watched the movie Food, Inc. and read Fast Food Nation. Both explained that our vegetables can travel 1500 miles to my grocery store and are chemically treated to retain freshness. Between my desire to support local farmers and my even stronger desire to avoid developing some odd cancer, I decided to educate myself on what I can do.
I talked to my girlfriend and we thought it was best if we used a cooperative food program to support local farmers (we use Grow Alabama). This has been a great alternative for us, however it’s still costly. One day I thought “hey how hard could it be to build a garden?” So I thought I’d take a whack at it despite never having successfully grown anything but a beard before.
Income and time are hindrances for me so I don’t have the cash to really plop down for a compost bin, landscape materials and fancy garden implements but I do know how to research and use a hammer.
I learned that the south facing wall (for maximum sun) of your house is your friend, building square foot gardens out of scrap wood is easy and asking other gardeners for tips are free. The result? I have a working garden and things are sprouting up.
This is what our garden plot looked like before I started it
I started with a compost made out of an old garbage can. I learned how to do this by
watching this youtube clip.
I read The Square Foot Garden by Mel Bartholomew. Between the scrap wood I found from pallets, Home Depot’s culled wood section ($.51 wood! woohoo!) and some elbow grease I was able to construct three raised beds, which probably cost me fifteen dollars.
We had a lot of containers laying around doing nothing but collecting rain, so I took some old pallets and converted them to tiered tables to set them on.
I had some left over pallets so I built a shed/compost area to hold our wheelbarrow, compost bin and other gardening supplies. After all, this is the burbs and we don’t want to offend the neighbors.
I hate paying exuberant prices for mushrooms so I decided to make my own Shiitake garden. With one pallet, some wood from a local lumber yard, a drill and this youtube clip, I was able to start a Shiitake garden (I got the starter kit from here.)
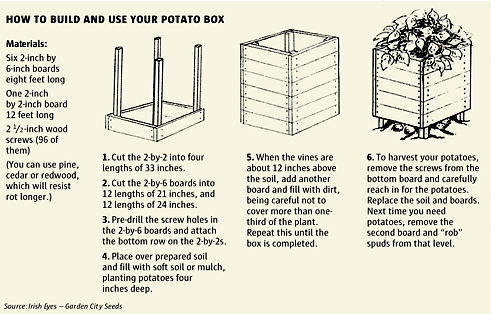
I built a potato box with scrap wood laying around. (I found the instructions here.)
Raccoons and pests live around the area, they’ve already raided my potato box and stolen most of them. So I have started building cages for everything
Those Topsy-Turvy strawberry planters sure look neat, but I was able to make my own by cutting holes in a gallon milk jug. Effective AND earth-friendly!
In addition to my compost bin, I’ve started a worm bin. I have 1,000 red wigglers (I bought mine from here) and I feed them our table scraps. So far they have not been devouring food like I had hoped, but they are making compost and I’ll be putting them in the garden once the last frost has come and gone.
I’ve been able to keep my costs way down by asking businesses if I can have their pallets, going to the culled wood section of home depot and using scrap wood laying around (just make sure it isn’t treated or have any toxins on it). I have access to a table saw and drill and the things I didn’t have, I borrowed my neighbor’s (such as a chainsaw).
The result? Well I don’t know what’s going to happen. Perhaps this whole garden thing will be a huge failure or maybe we’ll be yielding large quantities of vegetables this spring/summer. I’ve already got garlic and onions coming up and I’m optimistic that more is soon to follow. Speaking of following, want updates on how my garden is doing?


